
승띵이의 개발일지
[Spring Boot] 메모장 만들기2 (feat. MyBatis) 본문
Mybaits를 활용하여 더욱 간결하게 메모장을 만들어 보았다.
MyBatis에 대한 자세한 설명은 https://myung-it.tistory.com/25 참고
[Spring Boot] MyBatis
MyBatis 필요한 DB 관련 메서드는 인터페이스에 정의하고, 그 인터페이스 및 이가 포함하는 메서드 등을 외부 XML과 연결하여 쿼리를 자바 코드와 분리하여 관리하기 위해 사용한다. 엔티티(Entity)
myung-it.tistory.com
MyBatis 설정
MyBatis를 사용하기 위해 MyBatis-spring-boot-starter 의존성을 추가해 주어야 한다.

의존성은 메이븐 공개 저장소에서 다운로드 가능하다.
메이븐 공개 저장소 : https://mvnrepository.com
application.properties 설정
의존성을 추가했다면 application.properties 파일을 설정해 준다.
#MyBatis에서 활용할 XML 파일의 위치
mybatis.mapper-locations=classpath:mappers/**/*.xml

#사용할 DBMS의 JDBC DRIVER 전체 경로
spring.datasource.driver-class-name=org.mariadb.jdbc.Driver
#DBMS URL
spring.datasource.url=jdbc:mariadb://localhost:12602
#DBMS 사용자 이름
spring.datasource.username=root
#DBMS 사용자 비밀번호
spring.datasource.password=test1234
MemoMapper.xml 파일 만들기
해당 형식으로 XML 파일을 생성해 준다.
필요한 DB 관련 메서드는 인터페이스에 정의하고, 그 인터페이스 및 이가 포함하는 메서드 등을 외부 XML과 연결하여 쿼리를 자바 코드와 분리하여 관리하기 위해 사용한다.
본인의 경우 메모의 이름, 메모 값을 DB에 insert 하기 위해 <insert> 태그를 추가하였다.
<?xml version="1.0" encoding="UTF-8" ?>
<!DOCTYPE mapper
        PUBLIC "-//mybatis.org//DTD Mapper 3.0//EN"
        "http://mybatis.org/dtd/mybatis-3-mapper.dtd">
<mapper namespace="com.smchoi.study_web.mappers.IMemoMapper">
    <insert id="insertMemo"
            useGeneratedKeys="true"
            keyColumn="index"
            keyProperty="index"
            parameterType="com.smchoi.study_web.entities.study.MemoEntity">
        insert into study.memos (`name`, `text`)
        values (#{name}, #{text}) #작동원리 : name -> Name -> get+Name -> getName()
    </insert>
</mapper>
이렇게까지 완료했다면 MyBatis 설정 끝!
이제 MyBatis를 활용해 코드를 간결하게 수정해보자
MemoController 클래스
MyBatis를 활용함으로 Class.forName(...) 구문을 작성할 필요가 없어져 코드가 한결 간결해진다.
보기 좋아~ 짧은게 최고
package com.smchoi.study_web.controllers;

import com.smchoi.study_web.entities.study.MemoEntity;
import com.smchoi.study_web.services.MemoService;
import org.springframework.beans.factory.annotation.Autowired;
import org.springframework.stereotype.Controller;
import org.springframework.web.bind.annotation.RequestMapping;
import org.springframework.web.bind.annotation.RequestMethod;
import org.springframework.web.servlet.ModelAndView;

import java.sql.SQLException;

@Controller(value = "com.smchoi.study_web.controllers.MemoController")
@RequestMapping(value = "/memo")
public class MemoController {
    private final MemoService memoService; //상수 값 지정하기는 생성자 생성으로 ㄱㄴ

    @Autowired  //@Service 어노테이션 때문에 인식 가능
    public MemoController(MemoService memoService) {
        this.memoService = memoService;
    }

    @RequestMapping(value = "/", method = RequestMethod.GET)
    public ModelAndView getIndex() {
        ModelAndView modelAndView = new ModelAndView("memo/index");
        return modelAndView;
    }

    //메모 내용 콘솔창에 출력하기
    @RequestMapping(value = "/", method = RequestMethod.POST)
    public ModelAndView postIndex(MemoEntity memo) throws ClassNotFoundException, SQLException {
        this.memoService.addMemo(memo);
        System.out.printf("이름 : %s\n", memo.getName());
        System.out.printf("내용 : %s\n", memo.getText());
        System.out.printf("순번 : %d\n", memo.getIndex());
        ModelAndView modelAndView = new ModelAndView("memo/index");
        return modelAndView;
    }


}
MemoService 클래스
MemoService는 IMemoMapper를 매개변수(memo)로 받고 addMemo는 MemoEntity를 매개변수로 받아 memoMapper.insert() 메서드를 사용한다.
package com.smchoi.study_web.services;

import com.smchoi.study_web.entities.study.MemoEntity;
import com.smchoi.study_web.mappers.IMemoMapper;
import org.springframework.beans.factory.annotation.Autowired;
import org.springframework.stereotype.Service;

import java.sql.Connection;
import java.sql.DriverManager;
import java.sql.PreparedStatement;
import java.sql.SQLException;

@Service(value = "com.smchoi.study_web.services.MemoService")
public class MemoService {
    private final IMemoMapper memoMapper;

    @Autowired
    public MemoService(IMemoMapper memoMapper) {
        this.memoMapper = memoMapper;
    }

    public void addMemo(MemoEntity memo) {
        this.memoMapper.insertMemo(memo);
    }
}
IMemoMapper 인터페이스
인터페이스 IMemoMapper는 MemoEntity를 매개변수로 가진다.
package com.smchoi.study_web.mappers;

import com.smchoi.study_web.entities.study.MemoEntity;
import org.apache.ibatis.annotations.Mapper;

@Mapper
public interface IMemoMapper {
    int insertMemo(MemoEntity memo);
}
MemoEntity 클래스
package com.smchoi.study_web.entities.study;

import java.util.Objects;

public class MemoEntity {
    private int index;
    private String name;
    private String text;

    public int getIndex() {
        return index;
    }

    public void setIndex(int index) {
        this.index = index;
    }

    public String getName() {
        return name;
    }

    public void setName(String name) {
        this.name = name;
    }

    public String getText() {
        return text;
    }

    public void setText(String text) {
        this.text = text;
    }

    @Override
    public boolean equals(Object o) {
        if (this == o) return true;
        if (o == null || getClass() != o.getClass()) return false;
        MemoEntity that = (MemoEntity) o;
        return index == that.index;
    }

    @Override
    public int hashCode() {
        return Objects.hash(index);
    }
}
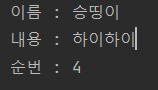
결과
위와 같이 모든 작업을 끝내고 http://localhost:8080/memo/ 에 접속하여 이름과 메모를 입력하면 아래와 같이 콘솔창에 이름, 내용, 순번이 출력되고 DB 테이블에 값이 Insert 된다.


'언어 > Spring Boot' 카테고리의 다른 글
| [Spring Boot] 회원 가입 사이트 만들기 1 (2) | 2022.11.02 |
|---|---|
| [Spring Boot] 메모장 만들기3 (Select, Delete, DeleteAll 기능 추가) (0) | 2022.10.31 |
| [Spring Boot] MyBatis (0) | 2022.10.26 |
| [Spring Boot] DB 연동 (feat. 메모장 만들기) (3) | 2022.10.26 |
| [Spring Boot] 메모장 만들기(feat. HTML, CSS, JS) (2) | 2022.10.26 |


